How to migrate your blog from WordPress to Hashnode

I'm a software consultant who loves to build projects and share my learnings on this blog.
This is a step-by-step guide for migrating a blog from WordPress to Hashnode.
Thanks to Tina Holly's blog post and scripts which helped me migrate my WordPress blog site to Hashnode. This blog post builds on the same but provides a more detailed guide on the migration.
We will cover the migration in 4 main steps :
- Download post content from WordPress
- Download images
- Publish posts to Hashnode using their API
- Get migration scripts
- Clean the downloaded posts
- Publish posts to Hashnode
- Backdate the posts and manually fix the images
Download post content from WordPress
To begin the migration, you would need to first download your existing posts on WordPress. By default, these are in XML format, but we will use the WP Import Export Lite to export the posts as JSON.
- Head to your WordPress site's admin panel.
- Navigate to Plugins -> Add New and search for wp import export lite.
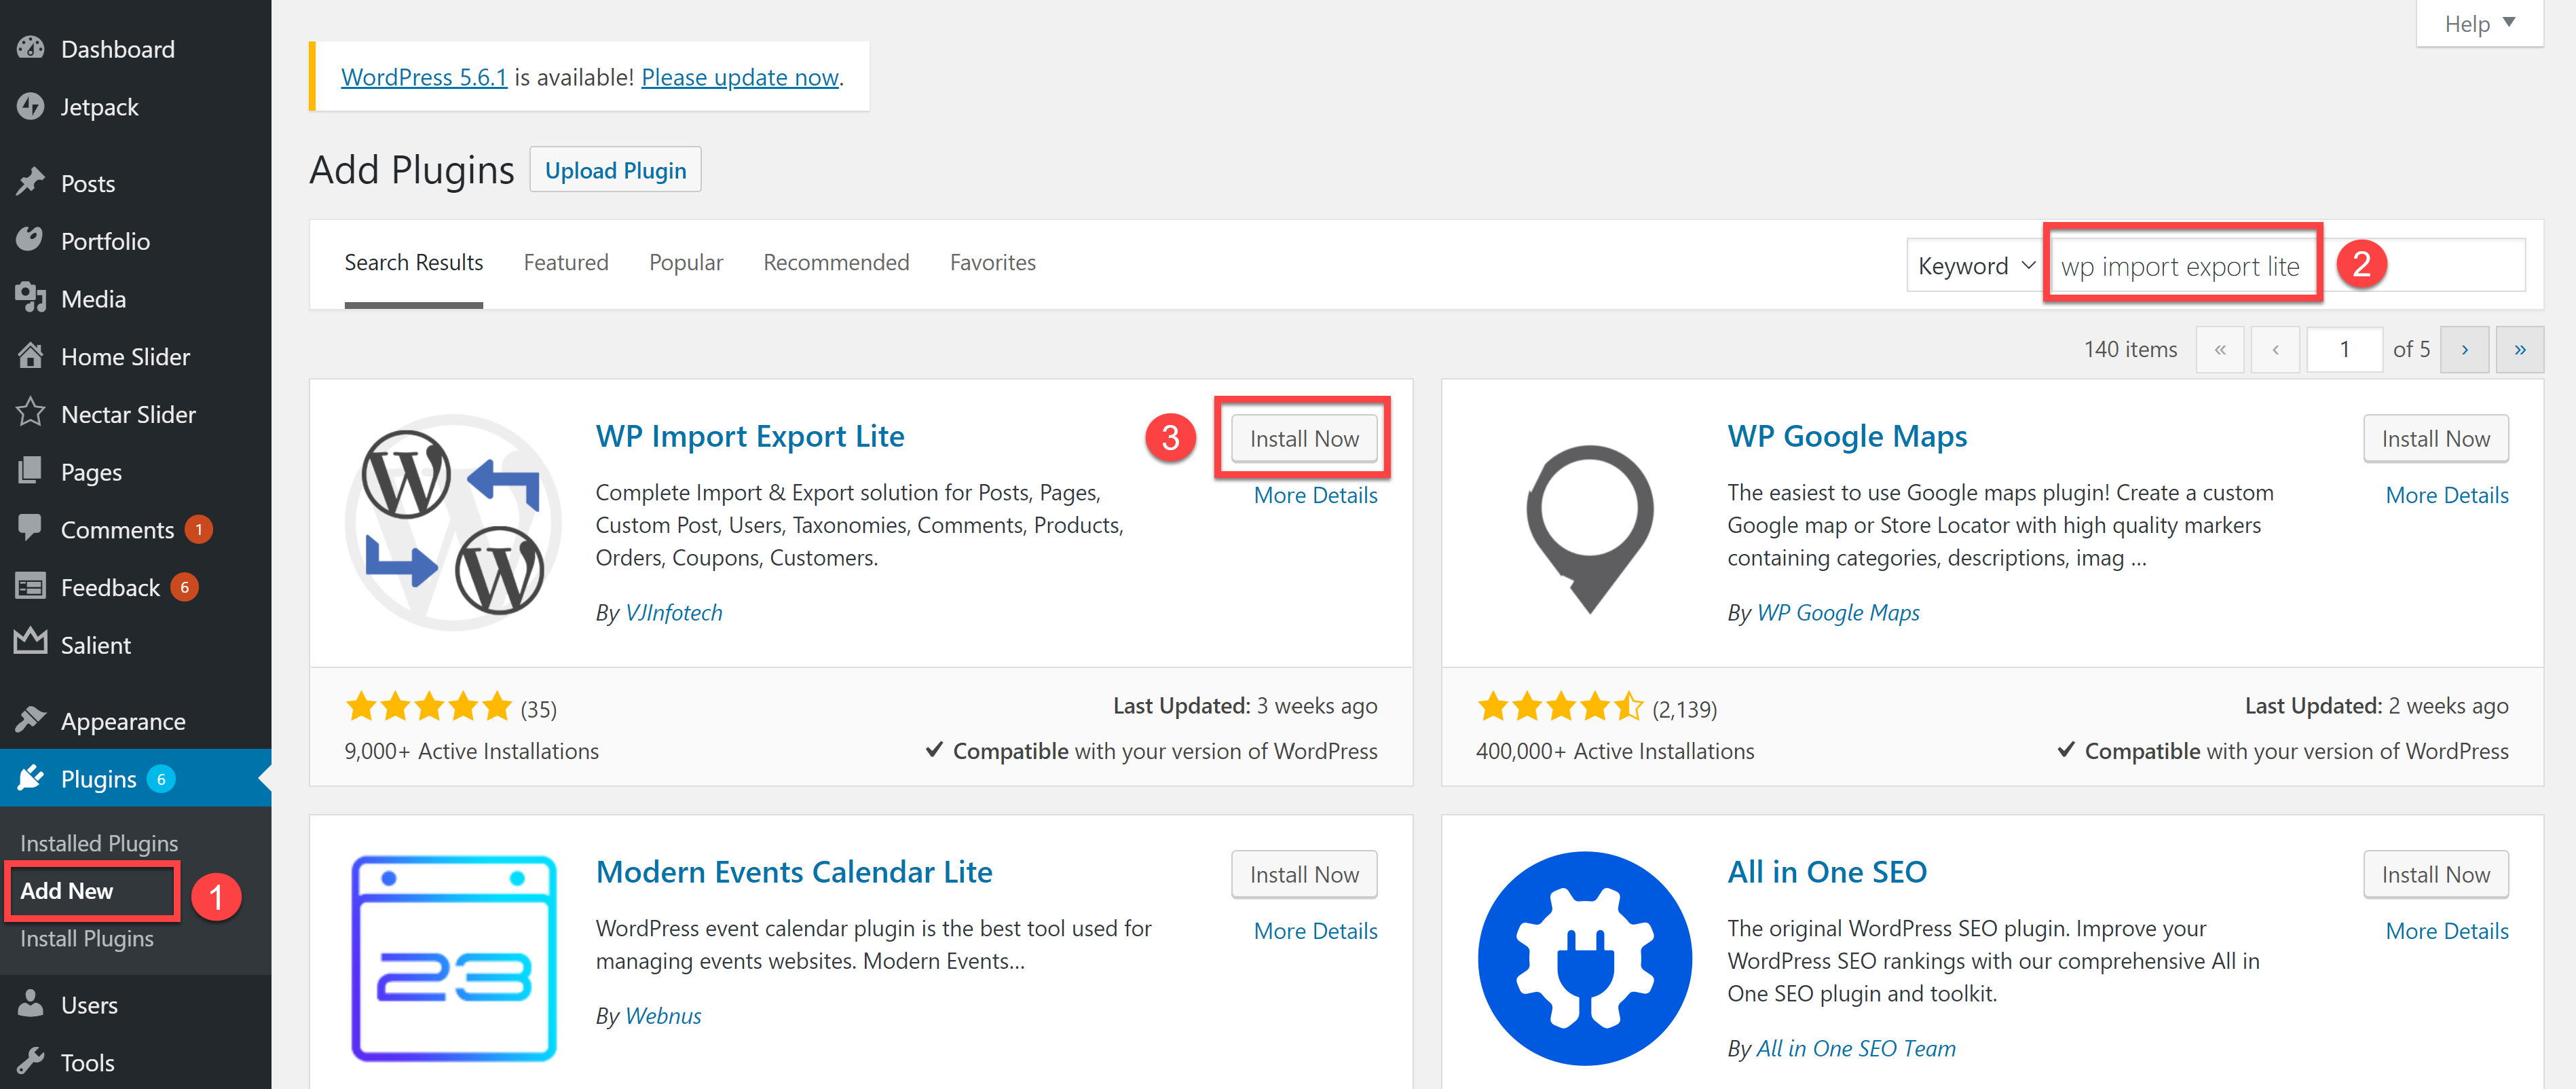
- Install and Activate the 'WP Import Export Lite' plugin.
- Now that the plugin is installed and activated, click on the
Exportoption in the plugin.
- On the New Export options page,
- Choose export type as
Post. - Leave the filtering options & fields section as is.
- In the advanced options section, choose export file type as
JSON. - Click on the
Customize Export Filebutton at the top right corner to begin the export.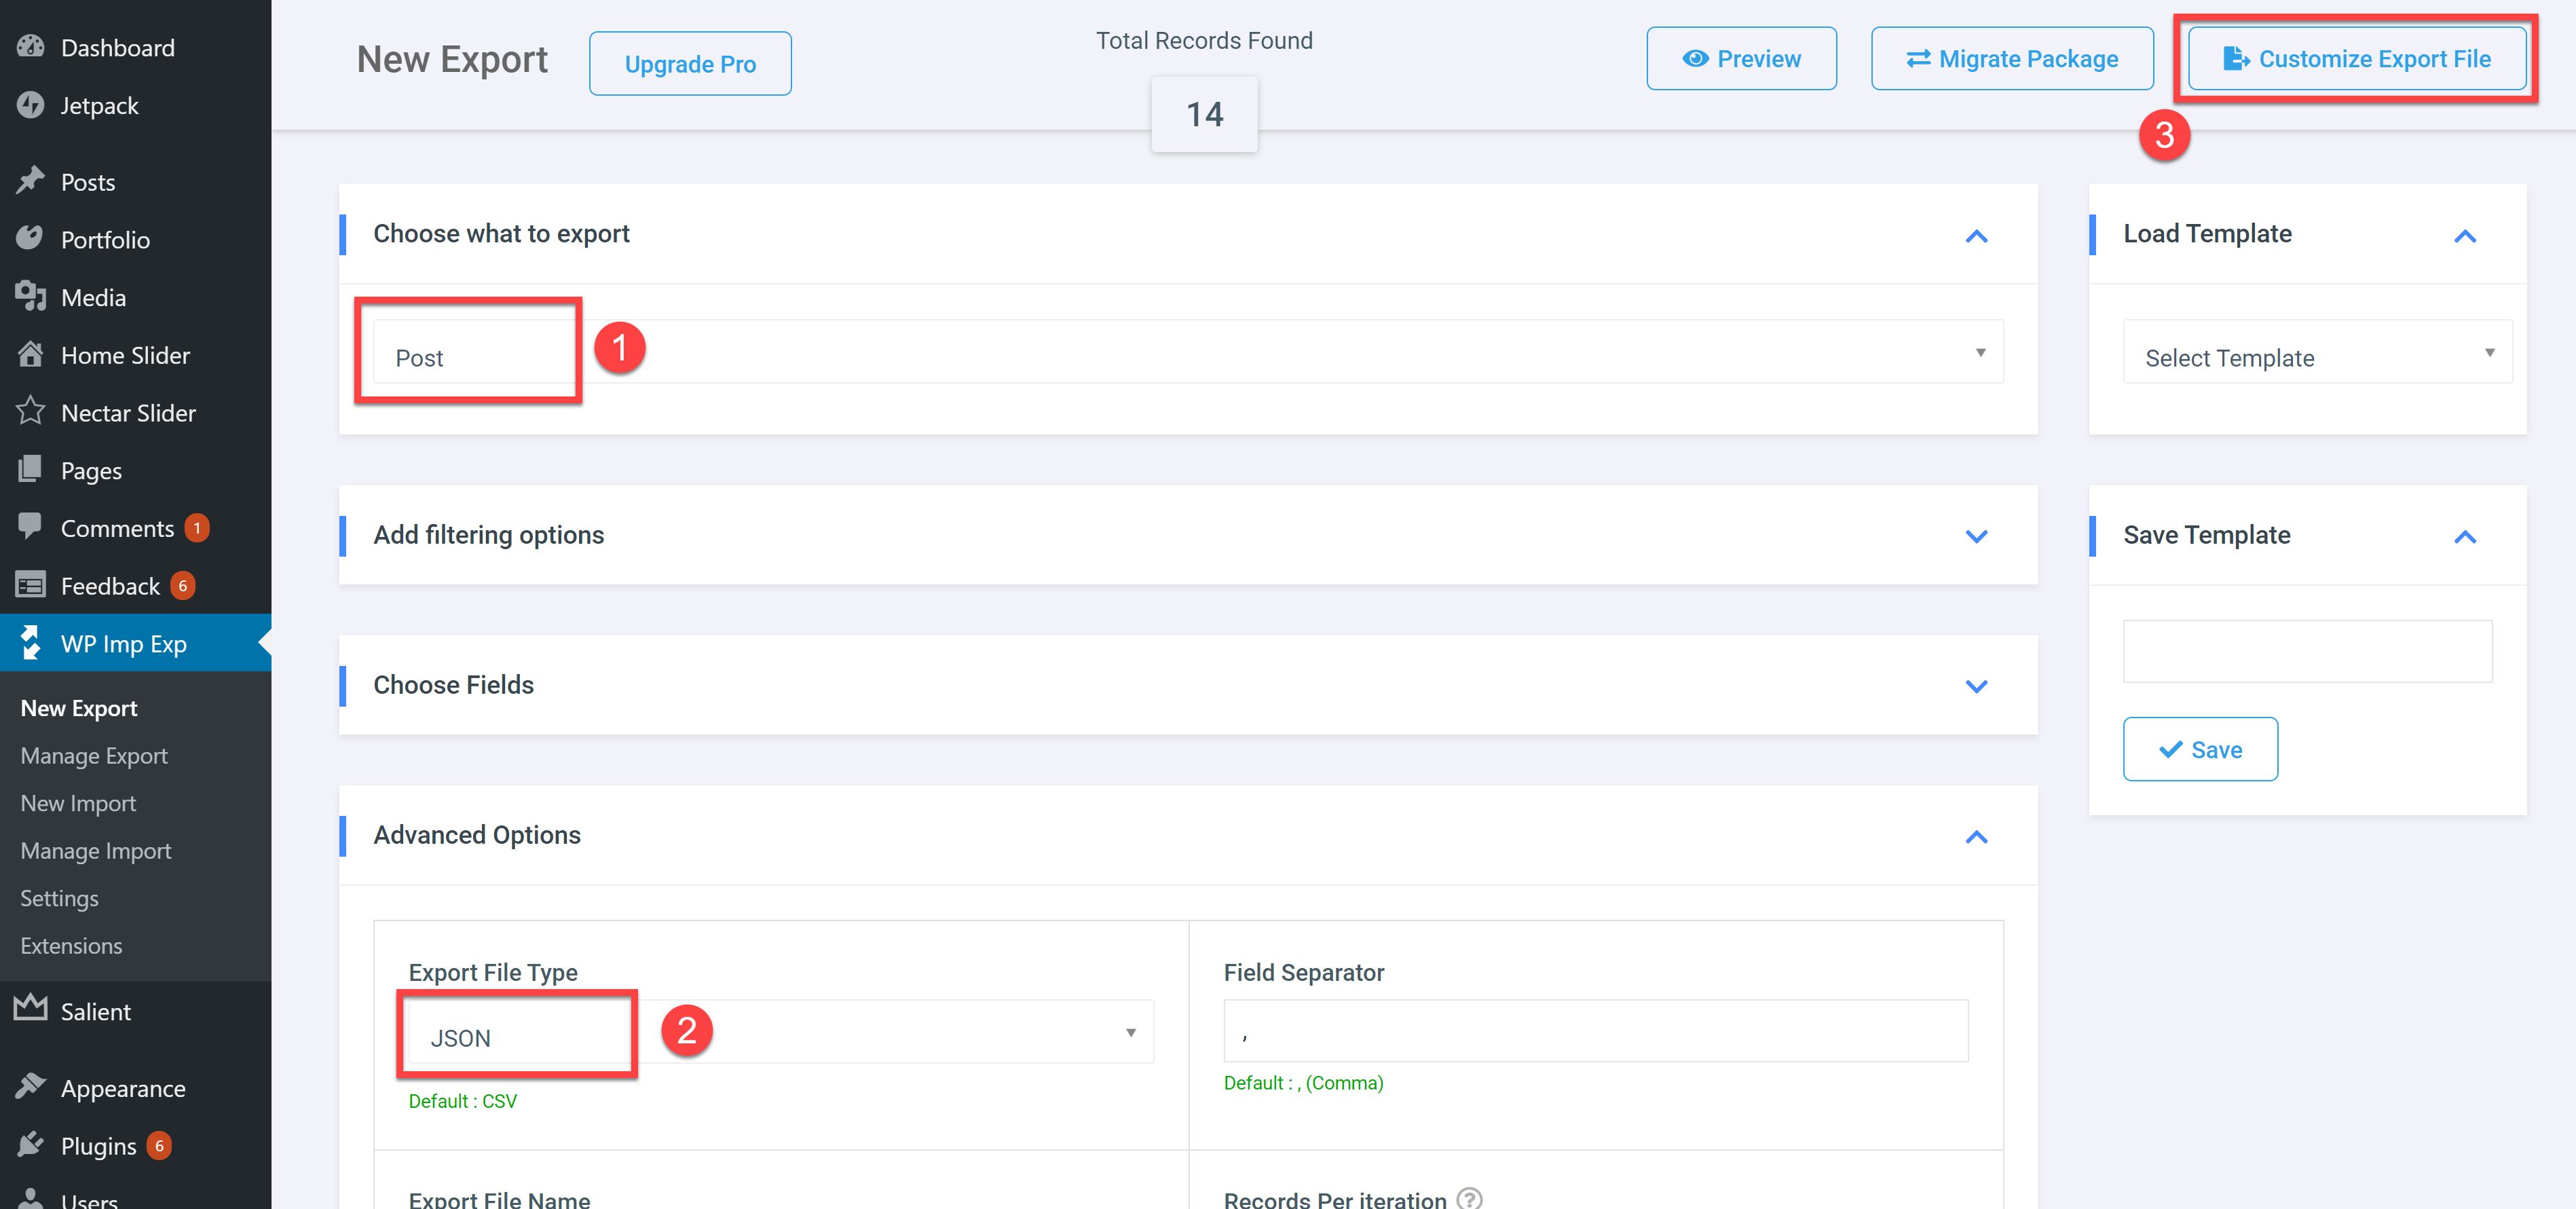
- Once the export process is completed, click on the
Downloadbutton to download the post's json file.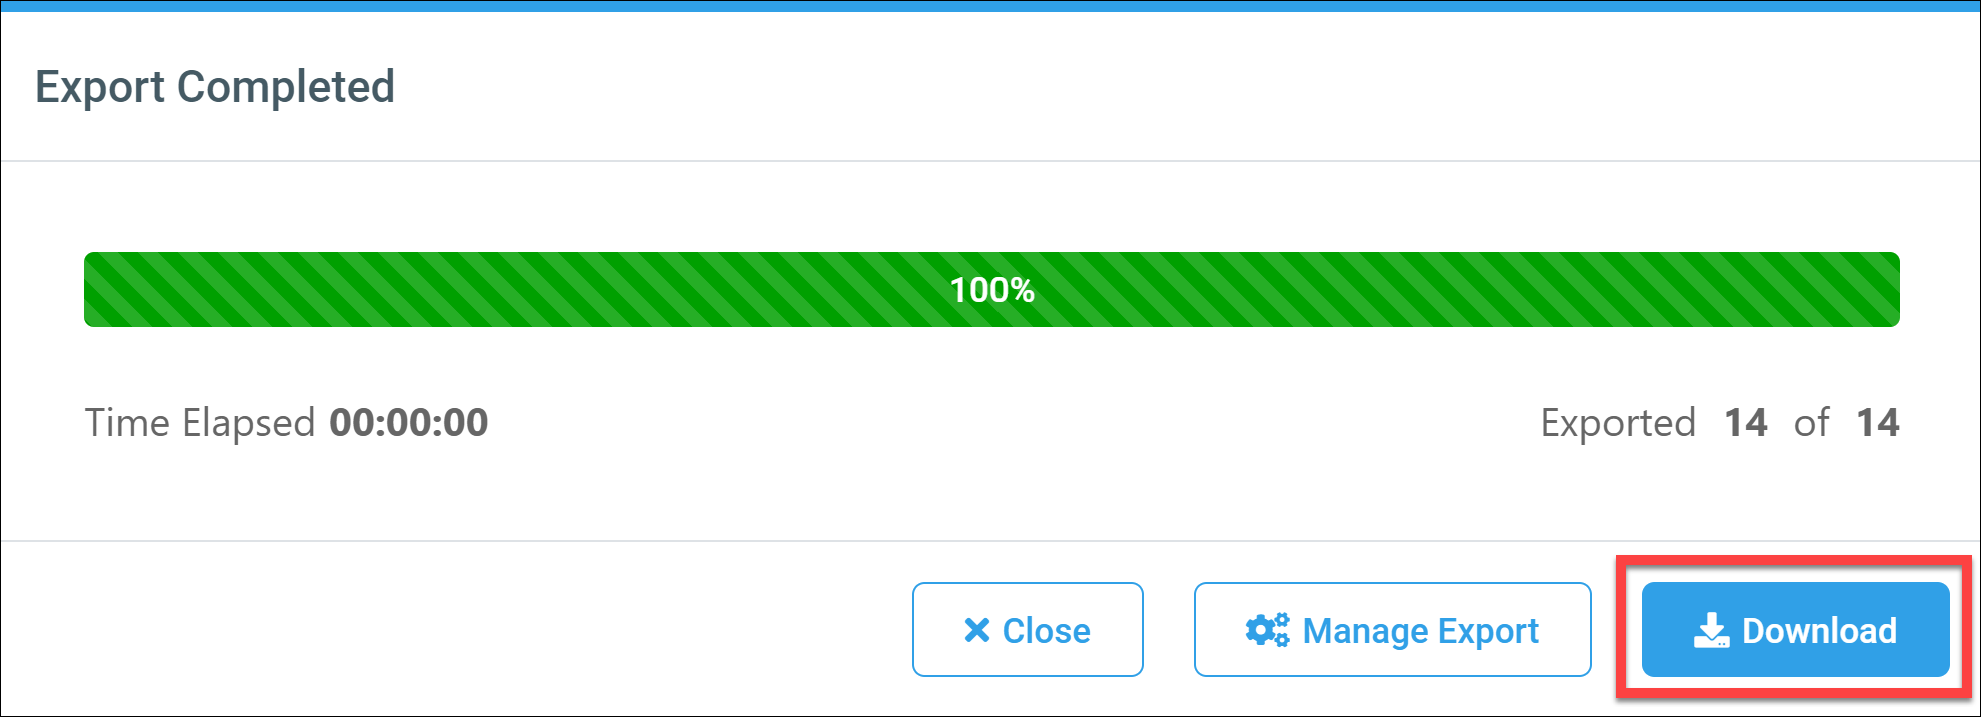
- The downloaded file will have an array of objects having the following shape.
{ "ID": "161", "Title": "Understanding CRON Expressions", "Content": "Many Azure resources like web jobs, Azure functions, logic apps use CRON expression [...]", "Excerpt": "", "Date": "August 29, 2018", "Post Type": "post", "Permalink": "http:\/\/kumarashwinhubert.com\/2018\/08\/29\/understanding-cron-expressions\/" } - Rename the downloaded json file to
posts.json
- Choose export type as
Download images
Next, you will need to download all your images from WordPress. Images are stored in the ./wp-content/uploads directory by year and month. There are many ways to download the images, but the easiest one is to use an SFTP tool to download this folder.
wp-content/
└── uploads
    ├── 2018
    │   ├── 01
    │   ├── 02
    │   └── 03
    └── 2019
        ├── 01
        ├── 02
        └── 03
Note: Currently there's no automatic way to migrate the images along with your blog post content. This article targets manually uploading the image to hashnode's CDN and updating the migrated blog posts at the end. In case you wish to use some other storage provider, please upload the images and replace the url in the posts.json file before proceeding further.
Publish posts to Hashnode using their API
Hashnode has a GraphQL API. It's somewhat limited in functionality but has most of the basic features. The API we intend to use is the createPublicationStory; but instead of manually cleaning the downloaded posts json and creating the request body to hit the API, we can use the migration scripts present in WordPress-Hashnode Migrator GitHub project.
The next set of steps will use this GitHub project to clean and publish the posts. This project is a node application hence ensure node is installed on your system.
Get migration scripts
- Clone the WordPress-Hashnode Migrator project from GitHub.
- Copy the downloaded
posts.jsonfrom the earlier step to the root of the cloned project. - Rename the
.env.sampleto.envThe folder structure will look like this: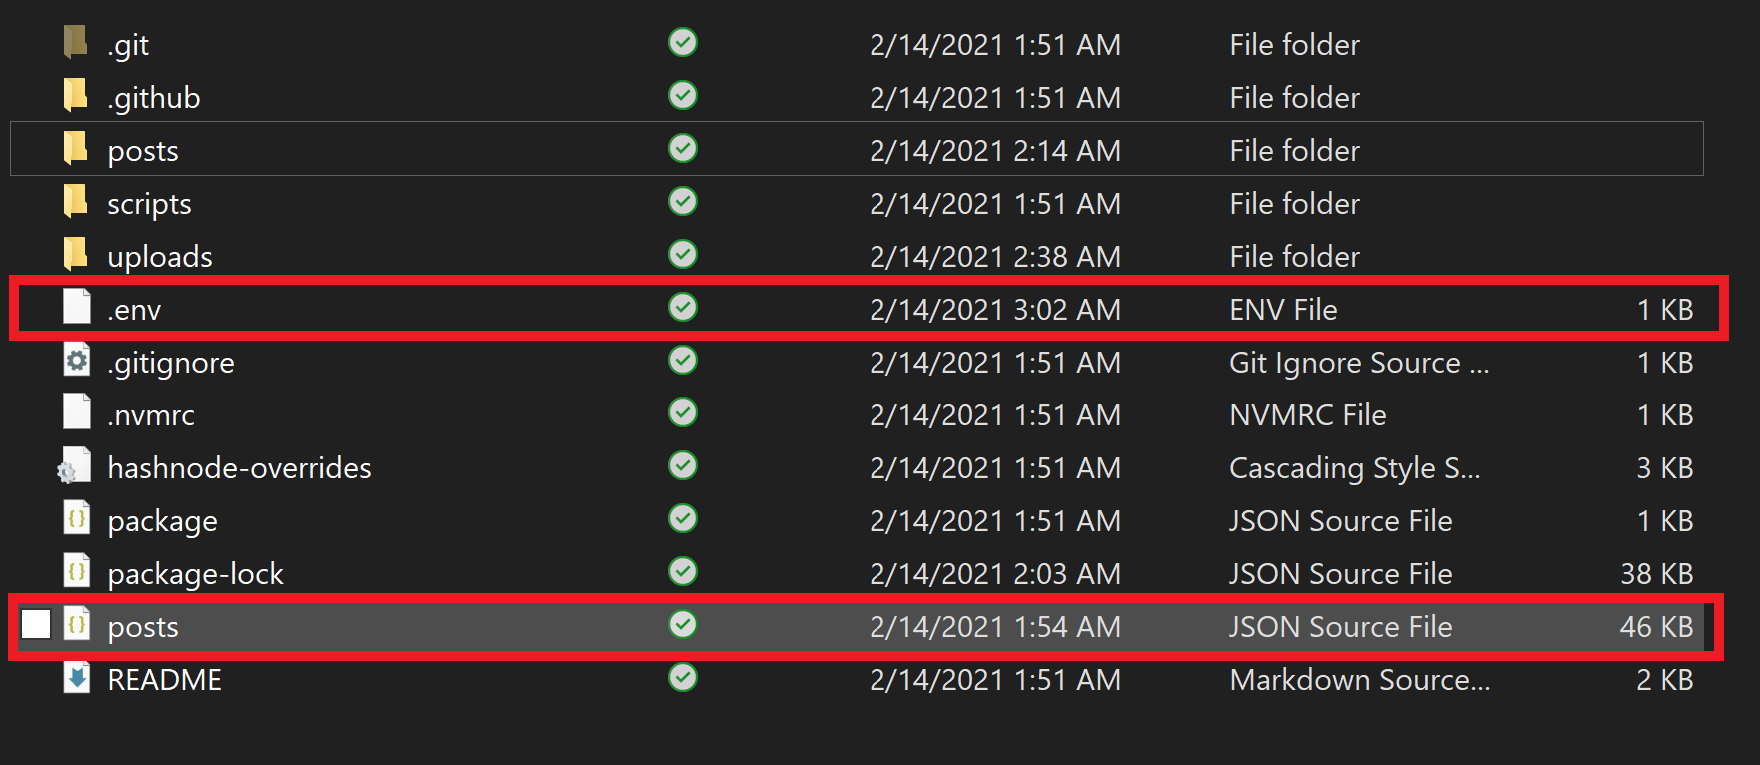
- Open a terminal in the cloned project and install the dependencies:
npm install
Clean the downloaded posts
This step processes the posts in ./posts.json and performs the following actions:
- removes dirty attributes from content HTML
- converts post content to Markdown
- writes a new file in ./posts/cleaned.json
Run the following command to clean the posts.
npm run cleanse
Publish posts to Hashnode
Ensure that you have already created a Hashnode site; if not, now would be a good time to create one as we need the Publication_Id and API_Key to continue.
- Head to the dashboard of your hashnode site. Copy and keep the publicationId from the url which would be in the form
https://hashnode.com/[Publication_Id]/dashboard - Navigate to the Developer settings page - https://hashnode.com/settings/developer and
Generate New Token. - Open the
.envfile in the project. Replace theHASHNODE_PUBLICATION_IDvalue with your publication id andHASHNODE_API_KEYwith your generated key.
The .env file should look like this :
HASHNODE_PUBLICATION_ID=602xxxa999eabxxxxxxx1a9b
HASHNODE_API_KEY=030xx44x-exx6-4xx4-8xxe-52xxxxxxxx1a
Save the .env file and head back to the terminal and run the following command to publish the posts to hashnode.
npm run migrate
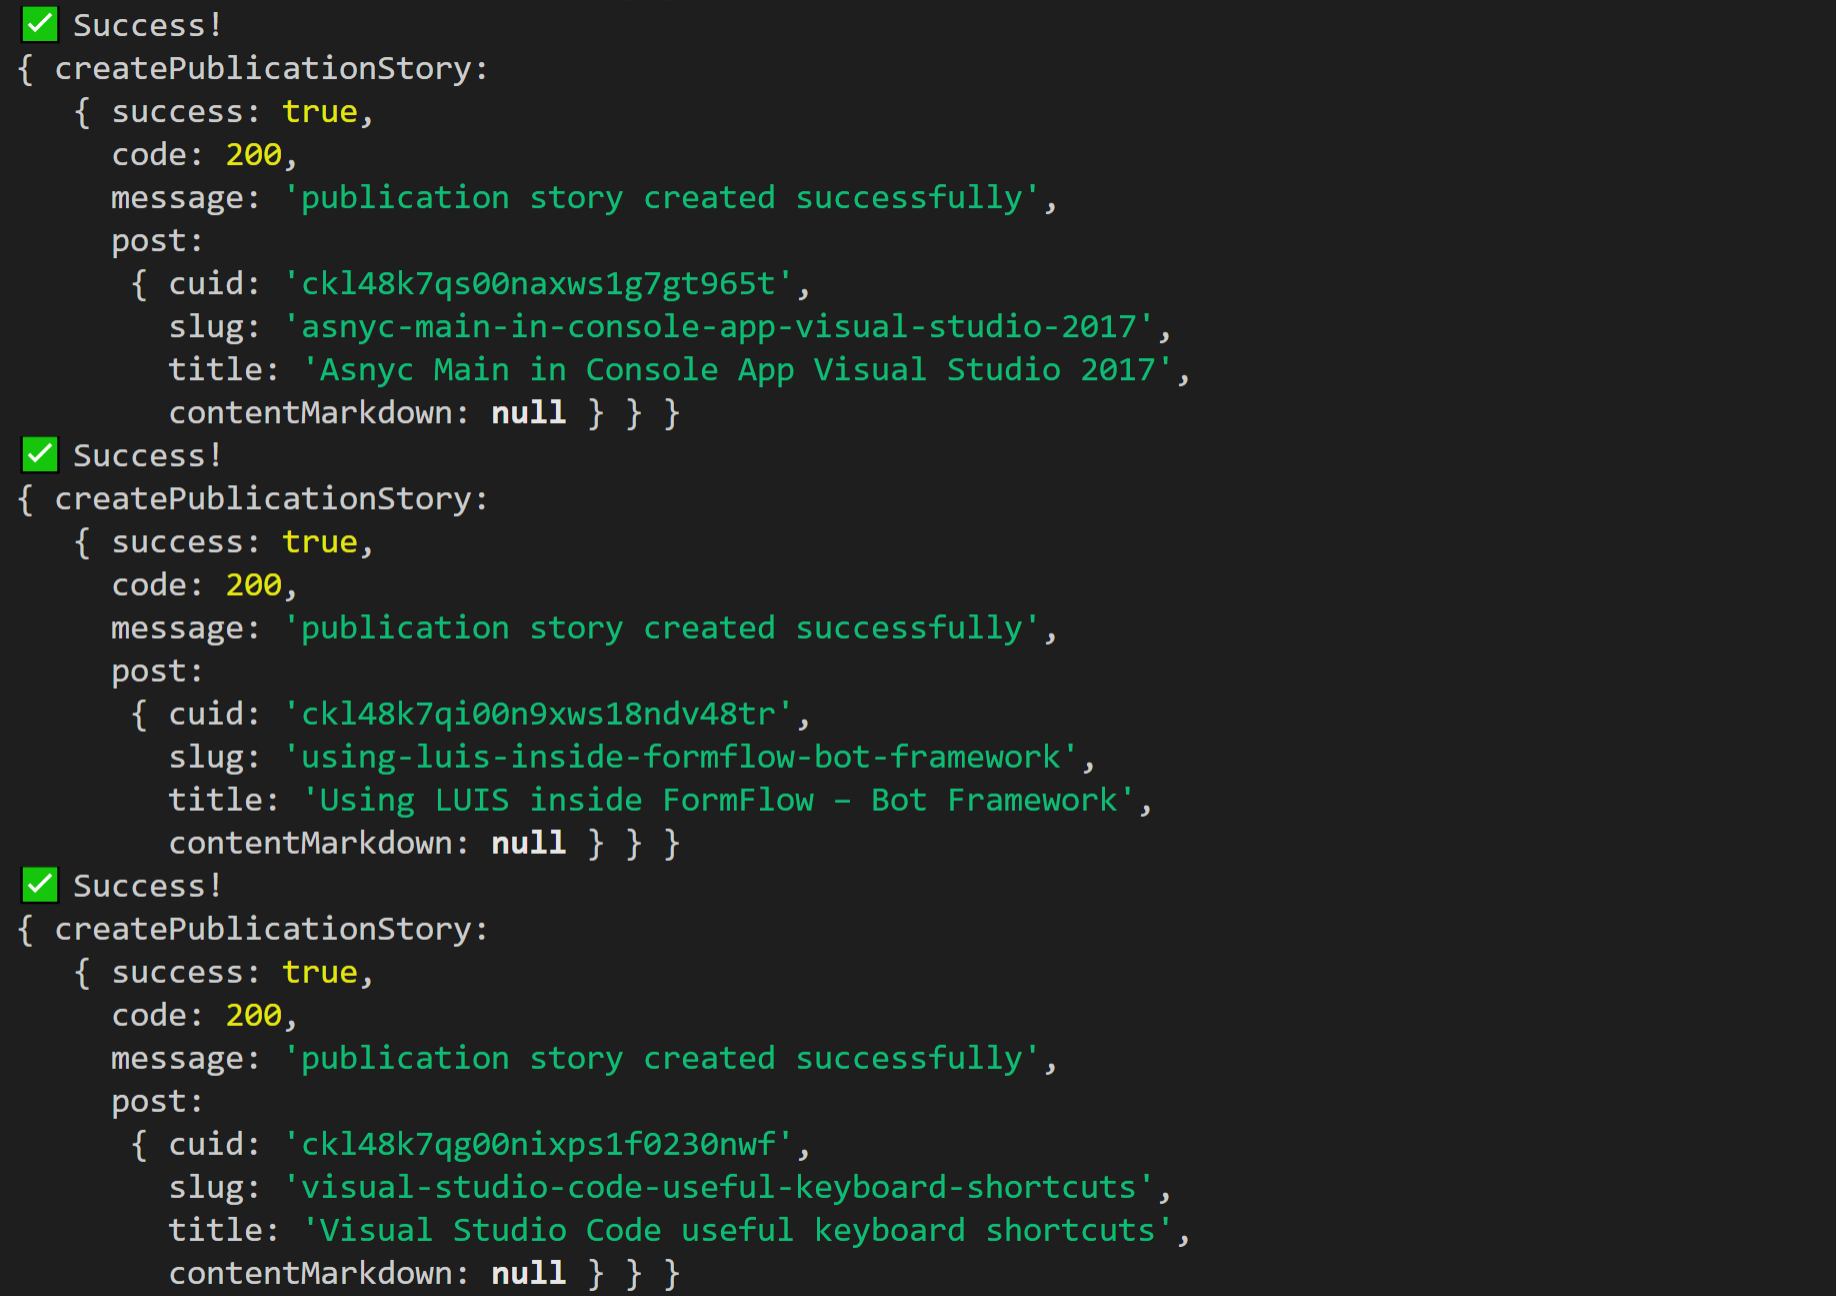
Once the script executes successfully, the blog posts would have been published to your hashnode site.
Backdate the posts and manually fix the images
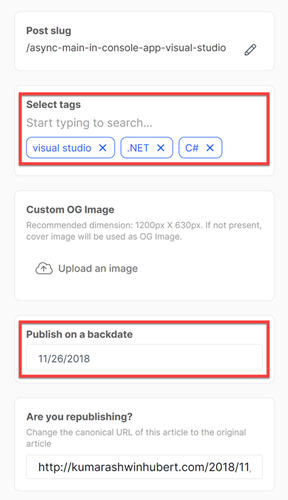
Currently backdating the posts is not supported in Hashnode's GraphQL API, hence it's required to manually update the backdate on each of the posts.
Navigate to each of the migrated posts and click on Edit -> Settings and set the backdate. Also set the tags & Cover Image if required.
As mentioned earlier, there isn't an easy way to migrate the images from your WordPress blog. You need to manually update the image in each blog post.
Navigate to each of the migrated posts and you would see the references to old images in the form of /wp-content/uploads/2020/08/filename.png. Use the Upload an image option in hashnode editor to upload the image from the WordPress images downloaded earlier.

Conclusion
That's it !!!
Your hashnode blog is up and running with all your migrated WordPress posts.
Hope this helped you in your migration journey from WordPress to Hashnode.